张登友,张登友的博客,张登友的网站——
在Windows10上打造一款强大的Linux子系统,完全兼容Linux命令,并且启动速度10 倍与虚拟机(科普来自[维基百科](适用于 Linux 的 Windows 子系统 - 维基百科,自由的百科全书 (wikipedia.org)))
适用于 Linux 的 Windows 子系统(英语:Windows Subsystem for Linux,简称WSL)是一个为在Windows 10和Windows Server 2019)上能够原生运行Linux二进制可执行文件(ELF格式)的兼容层。
概览
WSL提供了一个由微软开发的Linux兼容的内核接口(不包含Linux内核代码),然后可以在其上运行GNU用户空间,例如Ubuntu,openSUSE,SUSE Linux Enterprise Server,适用于_Linux_的_Windows_子系统Debian和Kali Linux。这样的用户空间可能包含Bash shell和命令语言,使用本机GNU/Linux命令行工具(sed,awk等),编程语言解释器(Ruby,Python等),甚至是图形应用程序(使用主机端的X窗口系统)。
简介和可用性
在周年更新中引入时,只有Ubuntu镜像可用。秋季创意者更新将Linux发行版的安装过程移至Microsoft商店,并引入了Fedora和[SUSE镜像。
WSL仅在版本1607之后的64位版本的Windows 10中可用。它也可在Windows Server 2019中使用。
发展
微软首次尝试在Windows上实现类似Unix的兼容性,首先是微软POSIX子系统,由Windows Services for UNIX通过MKS/Interix取代,后者最终因Windows 8.1的发布而被弃用。Windows Subsystem for Linux背后的技术起源于未发布的Astoria项目,它使一些Android应用程序能够在Windows 10 移动版上运行。它首先在Windows 10 Insider Preview build 14316中提供。
虽然微软以前的项目和第三方Cygwin专注于基于POSIX标准创建自己独特的类Unix环境,但WSL的目标是原生Linux兼容性。WSL不是将非原生功能包装到Win32系统调用中,而是利用NT内核执行程序将Linux程序作为特殊的、隔离的最小进程(称为“pico-processes”)作为专用系统连接到内核模式“pico-providers”。调用和异常处理程序不同于vanilla NT进程。
微软将WSL视为“主要面向开发人员的工具 — 尤其是Web开发人员以及在开源项目上工作或使用开源项目的人员”。WSL使用的资源少于完全虚拟化的机器,这是在Windows环境中运行Linux软件的最直接方式,同时还允许用户在同一组文件上使用Windows应用程序和Linux工具。
2020年9月,WSL 2开始向Windows 10 Version 1903/1909和Windows 10 May 2020(20H1/Version 2004)的用户推送。WSL 2支持GUI应用[。
体系结构
LXSS Manager Service是负责与子系统交互的服务(通过驱动程序lxss.sys和lxcore.sys),以及Bash.exe(不要与Linux发行版提供的Shell混淆)的方式启动Linux进程,以及在执行期间处理Linux系统调用和二进制锁。
特定用户调用的所有Linux进程都进入“Linux实例”(通常,第一个调用的进程是init)。关闭所有应用程序后,将关闭实例。
硬件和文件系统访问
由于没有硬件仿真/虚拟化(与coLinux等其他项目不同),WSL直接使用主机文件系统(通过VolFS和DrvFS)和硬件的某些部分,例如网络(Web服务器,用于例如,可以通过主机上配置的相同接口和IP地址进行访问,并且对使用需要管理权限的端口或已经被其他应用程序占用的端口共享相同的限制),这保证了互操作性。适用于_Linux_的_Windows_子系统#cite_note-19)
即使从shell运行sudo,某些位置(例如系统文件夹)和配置的访问/修改也受到限制。必须启动具有提升权限的实例才能获得“真正的sudo”并允许此类访问。
局限性
此子系统无法运行所有Linux软件(如32位二进制文件)或需要在WSL中未实现的特定Linux内核服务的软件。由于WSL中没有“真正的”Linux内核,因此无法运行内核模块(如设备驱动程序)。
可以通过在Windows(主机)环境(例如VcXsrv或)适用于_Linux_的_Windows_子系统#cite_note-pcworld-x112-22)中安装X窗口系统来运行一些图形(GUI)应用程序(例如Mozilla Firefox),尽管并非没有警告,例如缺乏音频支持或硬件加速(导致图形性能不佳)。目前还没有实施对[OpenCL和CUDA的支持,尽管计划在将来的版本中使用。
也就是说,微软明确指出WSL面向应用程序的开发者,而不是面向桌面环境或生产服务器,建议使用虚拟机(Hyper-V或Kubernetes)和[Azure来实现这些目的。
性能
在性能测试中,Windows Subsystem for Linux通常接近原生Linux,如Ubuntu,Debian,Intel Clear Linux或其他Linux发行版。I/O在某些测试中是WSL的瓶颈。
安装和使用WSL
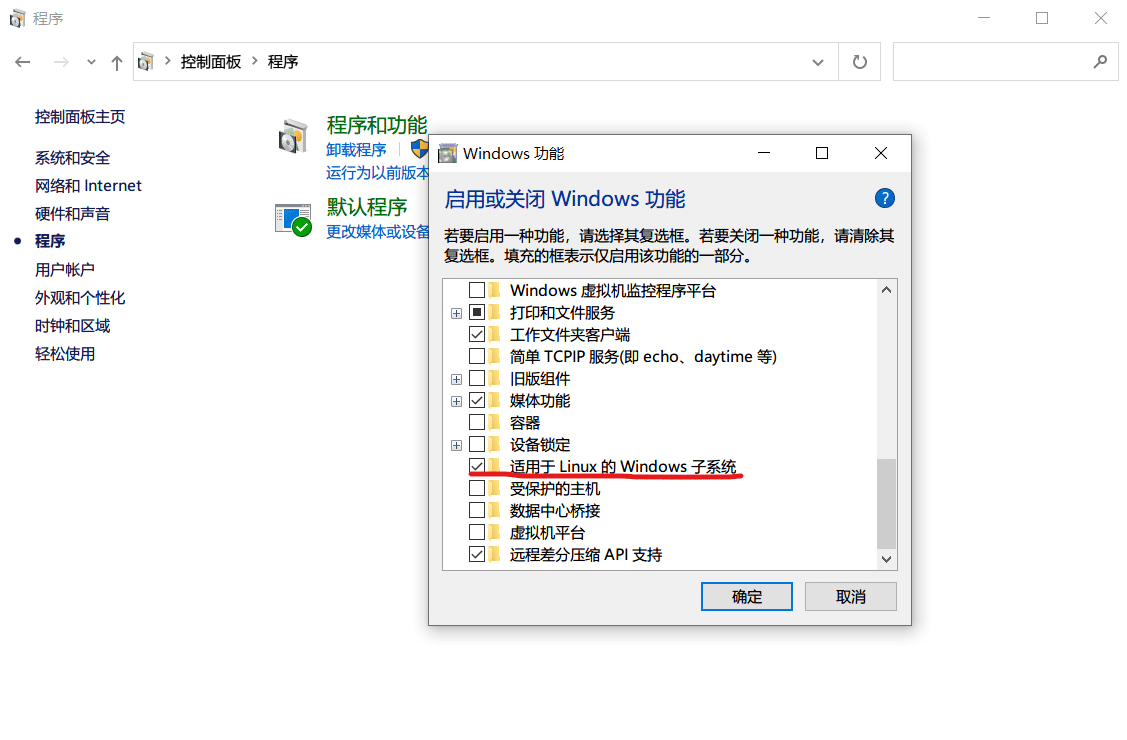
首先需要启用Windows10内置的wsl功能才可以继续下一步
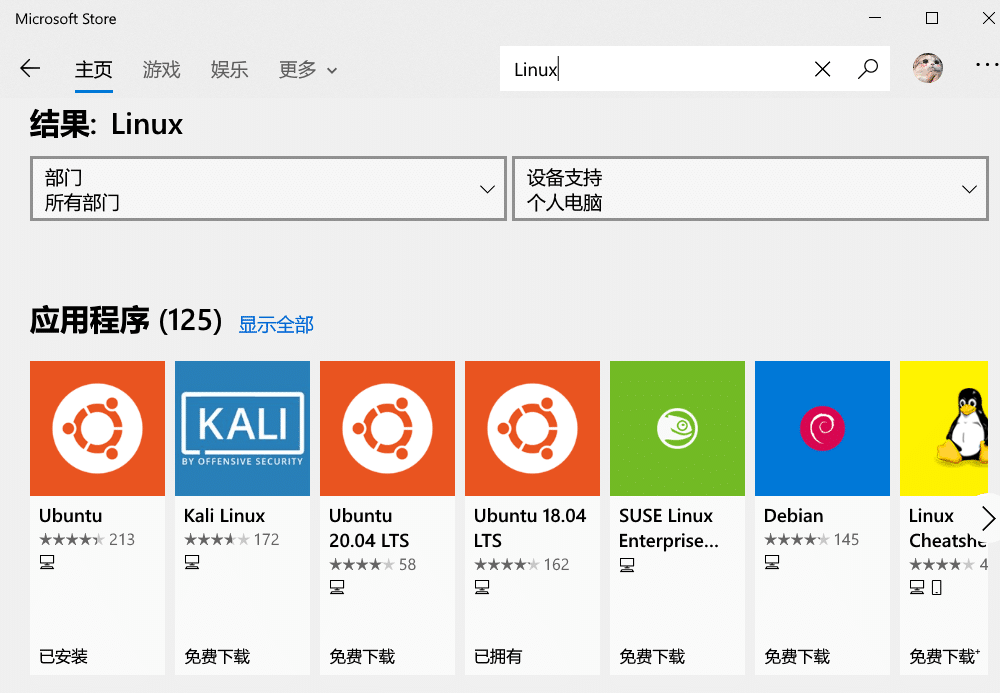
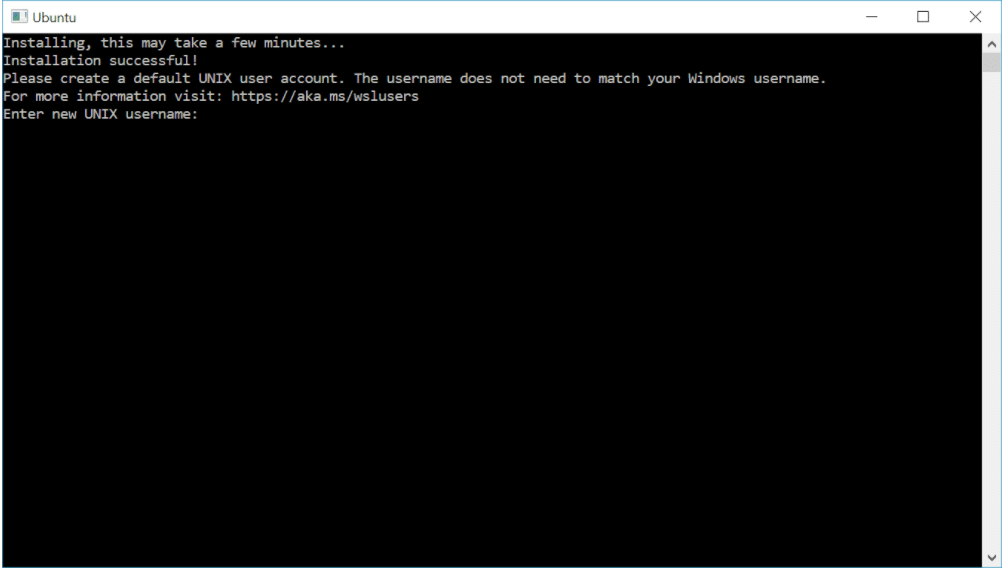
然后到Microsoft store搜索Linux,这里我安装的是Ubuntu,如果有别的需求也可以按照别的版本(Kali、Debian等)
安装完成即可打开Ubuntu,进行创建用户名和密码,到这里基本上就完成最原始的wsl安装了
在Windows Terminal中管理与体验WSL
当然,原生的cmd界面,emmm而且cmd、powershell、wsl分开的,不好管理,terminal可以新建不同的命令窗口。这里我选择使用Windows10在2019年新推出的terminal来进行管理和日常使用
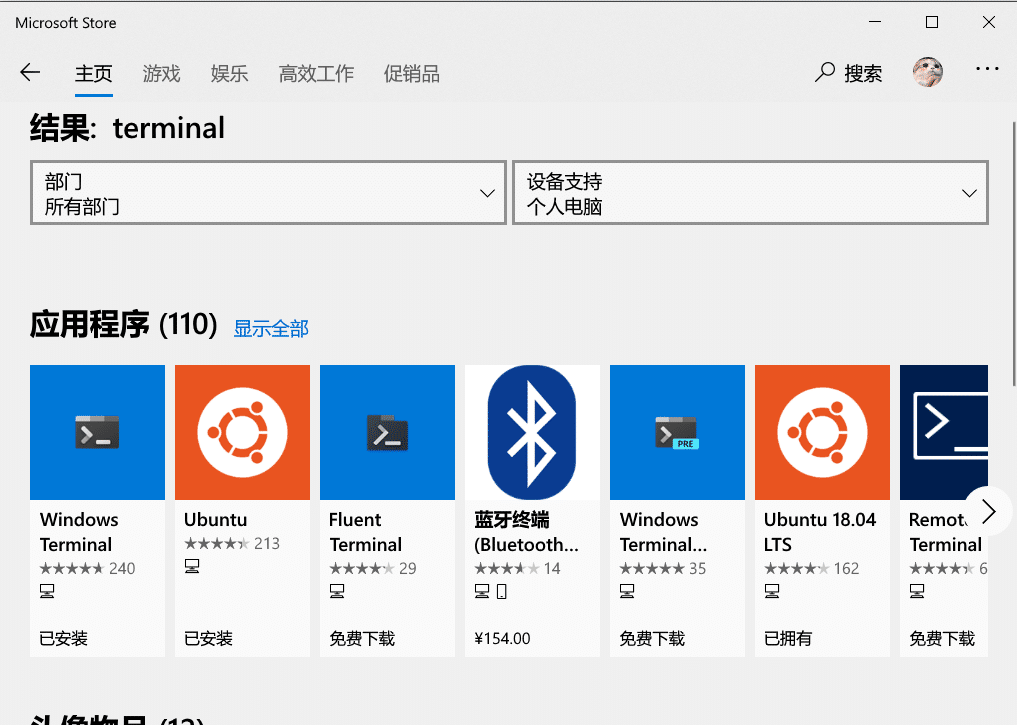
首先还是去Microsoft store搜索terminal
安装完成之后打开设置(json设置界面,会打开代码编辑器,如vscode等)
以下是我的配置文件
// This file was initially generated by Windows Terminal 1.0.1811.0
// It should still be usable in newer versions, but newer versions might have additional
// settings, help text, or changes that you will not see unless you clear this file
// and let us generate a new one for you.

// To view the default settings, hold "alt" while clicking on the "Settings" button.
// For documentation on these settings, see: https://aka.ms/terminal-documentation
{
    "$schema": "https://aka.ms/terminal-profiles-schema",

    "defaultProfile": "{2c4de342-38b7-51cf-b940-2309a097f518}",//默认启动的系统id
    "requestedTheme":"dark",
    "initialCols": 85,//终端窗口的宽度
    "initialRows": 25,//终端窗口的高度

    // You can add more global application settings here.
    // To learn more about global settings, visit https://aka.ms/terminal-global-settings

    // If enabled, selections are automatically copied to your clipboard.
    "copyOnSelect": false,

    // If enabled, formatted data is also copied to your clipboard
    "copyFormatting": false,

    // A profile specifies a command to execute paired with information about how it should look and feel.
    // Each one of them will appear in the 'New Tab' dropdown,
    //   and can be invoked from the commandline with `wt.exe -p xxx`
    // To learn more about profiles, visit https://aka.ms/terminal-profile-settings
    "profiles":
    {
        "defaults":
        {
            // Put settings here that you want to apply to all profiles.
            "useAcrylic" : true, // 毛玻璃特效
            "acrylicOpacity": 0.6, // 不透明度
            "cursorColor" : "#E6FF00", // 光标颜色
            "cursorShape" : "bar", // 光标类型
           "fontFace" : "Fira Code Retina", // 字体名称
           //"fontFace" : "微软雅黑",
            "fontSize" : 12, // 字体大小
            //"icon" : "", // 图标
            "backgroundImage": "D:\\1.png", // 背景图片
            "backgroundImageOpacity": 0.3, // 背景图片的不透明度
            "tabTitle" : "开始学习啦", //标签名称
            "startingDirectory" : "C:\\Users\\Desktop", // 起始文件夹路径
            "closeOnExit" : true, // 输入exit退出命令窗口
            "padding" : "10, 10, 10, 10", // 内容距离界面的内部距离
            "snapOnInput" : true, // 嗅探输入
            "historySize" : 100 // 历史大小
        },

        "list":
        [
            {
                "guid": "{2c4de342-38b7-51cf-b940-2309a097f518}",//安装完成自动导入的系统id
                "hidden": false,//是否隐藏
                "name": "Ubuntu",//窗口的名称
                "source": "Windows.Terminal.Wsl",
                "startingDirectory": "//wsl$/Ubuntu/home/zdy/"//默认目录
            },
            {
                // Make changes here to the powershell.exe profile.
                "guid": "{61c54bbd-c2c6-5271-96e7-009a87ff44bf}",
                "name": "Windows PowerShell",
                "commandline": "powershell.exe",
                "hidden": false
            },
            {
                // Make changes here to the cmd.exe profile.
                "guid": "{0caa0dad-35be-5f56-a8ff-afceeeaa6101}",
                "name": "命令提示符",
                "commandline": "cmd.exe",
                "hidden": true
            },
            {
                "guid": "{b453ae62-4e3d-5e58-b989-0a998ec441b8}",
                "hidden": true,
                "name": "Azure Cloud Shell",
                "source": "Windows.Terminal.Azure"
            }
        ]
    },

    // Add custom color schemes to this array.
    // To learn more about color schemes, visit https://aka.ms/terminal-color-schemes
    "schemes": [
        {
            "name": "Ubuntu",
        "black": "#2e3436",
        "red": "#cc0000",
        "green": "#4e9a06",
        "yellow": "#c4a000",
        "blue": "#3465a4",
        "purple": "#75507b",
        "cyan": "#06989a",
        "white": "#d3d7cf",
        "brightBlack": "#555753",
        "brightRed": "#ef2929",
        "brightGreen": "#8ae234",
        "brightYellow": "#fce94f",
        "brightBlue": "#729fcf",
        "brightPurple": "#ad7fa8",
        "brightCyan": "#34e2e2",
        "brightWhite": "#eeeeec",
        "background": "#300a24",
        "foreground": "#eeeeec"
        }
    ],

    // Add custom keybindings to this array.
    // To unbind a key combination from your defaults.json, set the command to "unbound".
    // To learn more about keybindings, visit https://aka.ms/terminal-keybindings
    "keybindings":
    [
        // Copy and paste are bound to Ctrl+Shift+C and Ctrl+Shift+V in your defaults.json.
        // These two lines additionally bind them to Ctrl+C and Ctrl+V.
        // To learn more about selection, visit https://aka.ms/terminal-selection
        { "command": {"action": "copy", "singleLine": false }, "keys": "ctrl+c" },
        { "command": "paste", "keys": "ctrl+v" },

        // Press Ctrl+Shift+F to open the search box
        { "command": "find", "keys": "ctrl+shift+f" },

        // Press Alt+Shift+D to open a new pane.
        // - "split": "auto" makes this pane open in the direction that provides the most surface area.
        // - "splitMode": "duplicate" makes the new pane use the focused pane's profile.
        // To learn more about panes, visit https://aka.ms/terminal-panes
        { "command": { "action": "splitPane", "split": "auto", "splitMode": "duplicate" }, "keys": "alt+shift+d" }
    ]
}
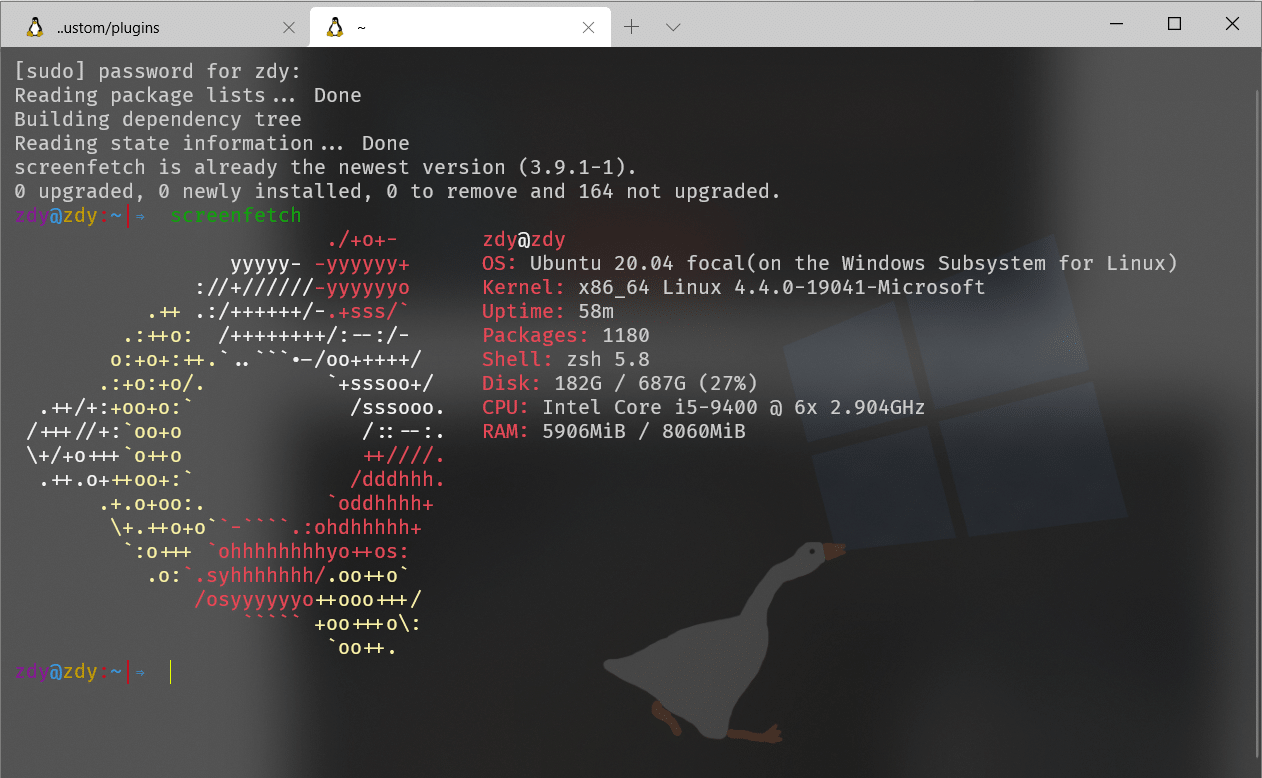
配置完成之后每次启动就可以默认启动Ubuntu啦!
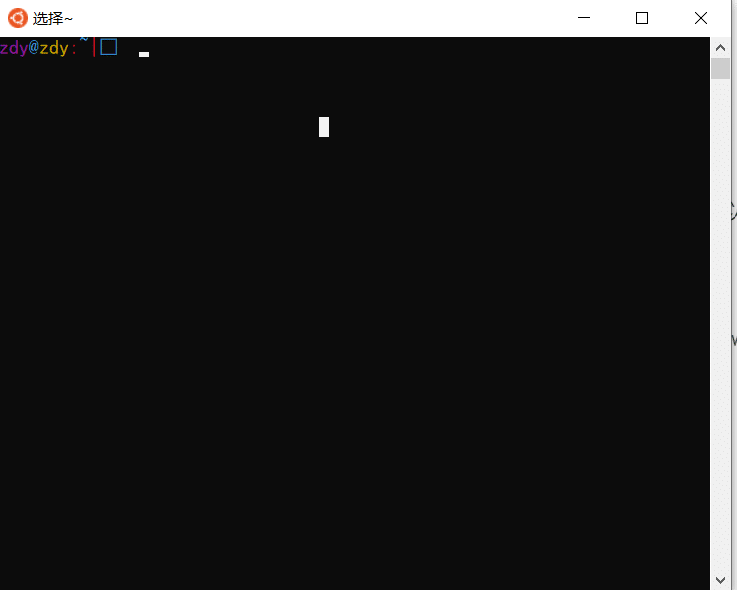
完成以上的设定后,点击选项卡中的下拉框,选择安装好的WSL版本便可以开始愉快的玩耍啦~ 可以看到,原来Windows中的文件均被挂载到了/mnt 目录下(C盘在 /mnt/c,D盘在 /mnt/d,依此类推),我们可以很方便地进行跨文件系统的访问。
美化Ubuntu终端
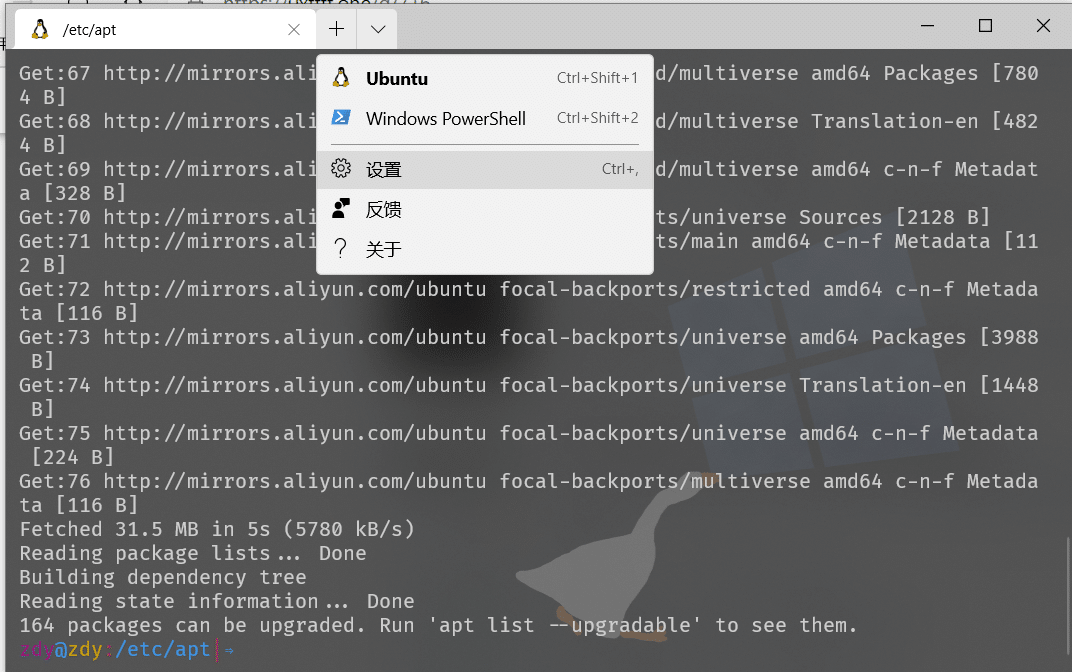
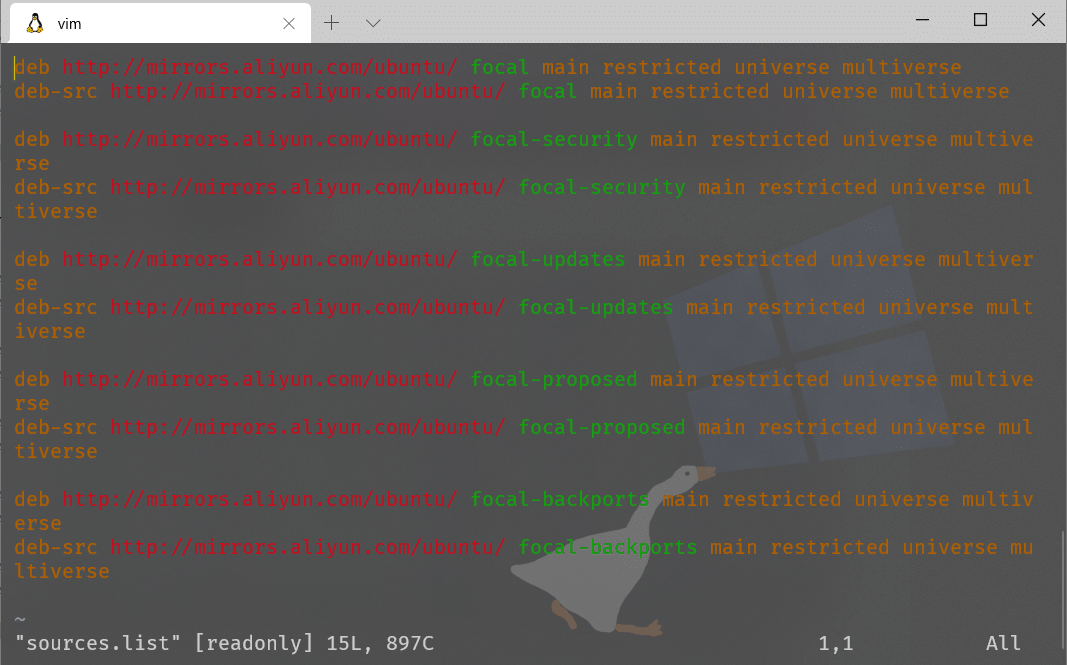
首先更换源(提高安装各种包的安装速度),这里我使用的是阿里云的开源镜像,用你熟悉的编辑器打开:
/etc/apt/sources.list替换默认的
http://archive.ubuntu.com/为
mirrors.aliyun.com效果如图:
Ubuntu 14.04.5 LTS的效果如下:
deb https://mirrors.aliyun.com/ubuntu/ trusty main restricted universe multiverse
deb-src https://mirrors.aliyun.com/ubuntu/ trusty main restricted universe multiverse
deb https://mirrors.aliyun.com/ubuntu/ trusty-security main restricted universe multiverse
deb-src https://mirrors.aliyun.com/ubuntu/ trusty-security main restricted universe multiverse

deb https://mirrors.aliyun.com/ubuntu/ trusty-updates main restricted universe multiverse
deb-src https://mirrors.aliyun.com/ubuntu/ trusty-updates main restricted universe multiverse

deb https://mirrors.aliyun.com/ubuntu/ trusty-backports main restricted universe multiverse
deb-src https://mirrors.aliyun.com/ubuntu/ trusty-backports main restricted universe multiverse

## Not recommended
# deb https://mirrors.aliyun.com/ubuntu/ trusty-proposed main restricted universe multiverse
# deb-src https://mirrors.aliyun.com/ubuntu/ trusty-proposed main restricted universe multiverse
ubuntu 16.04 配置如下
deb http://mirrors.aliyun.com/ubuntu/ xenial main
deb-src http://mirrors.aliyun.com/ubuntu/ xenial main

deb http://mirrors.aliyun.com/ubuntu/ xenial-updates main
deb-src http://mirrors.aliyun.com/ubuntu/ xenial-updates main

deb http://mirrors.aliyun.com/ubuntu/ xenial universe
deb-src http://mirrors.aliyun.com/ubuntu/ xenial universe
deb http://mirrors.aliyun.com/ubuntu/ xenial-updates universe
deb-src http://mirrors.aliyun.com/ubuntu/ xenial-updates universe

deb http://mirrors.aliyun.com/ubuntu/ xenial-security main
deb-src http://mirrors.aliyun.com/ubuntu/ xenial-security main
deb http://mirrors.aliyun.com/ubuntu/ xenial-security universe
deb-src http://mirrors.aliyun.com/ubuntu/ xenial-security universe
ubuntu 18.04(bionic) 配置如下
deb http://mirrors.aliyun.com/ubuntu/ bionic main restricted universe multiverse
deb-src http://mirrors.aliyun.com/ubuntu/ bionic main restricted universe multiverse

deb http://mirrors.aliyun.com/ubuntu/ bionic-security main restricted universe multiverse
deb-src http://mirrors.aliyun.com/ubuntu/ bionic-security main restricted universe multiverse

deb http://mirrors.aliyun.com/ubuntu/ bionic-updates main restricted universe multiverse
deb-src http://mirrors.aliyun.com/ubuntu/ bionic-updates main restricted universe multiverse

deb http://mirrors.aliyun.com/ubuntu/ bionic-proposed main restricted universe multiverse
deb-src http://mirrors.aliyun.com/ubuntu/ bionic-proposed main restricted universe multiverse

deb http://mirrors.aliyun.com/ubuntu/ bionic-backports main restricted universe multiverse
deb-src http://mirrors.aliyun.com/ubuntu/ bionic-backports main restricted universe multiver
ubuntu 20.04(focal) 配置如下
deb http://mirrors.aliyun.com/ubuntu/ focal main restricted universe multiverse
deb-src http://mirrors.aliyun.com/ubuntu/ focal main restricted universe multiverse

deb http://mirrors.aliyun.com/ubuntu/ focal-security main restricted universe multiverse
deb-src http://mirrors.aliyun.com/ubuntu/ focal-security main restricted universe multiverse

deb http://mirrors.aliyun.com/ubuntu/ focal-updates main restricted universe multiverse
deb-src http://mirrors.aliyun.com/ubuntu/ focal-updates main restricted universe multiverse

deb http://mirrors.aliyun.com/ubuntu/ focal-proposed main restricted universe multiverse
deb-src http://mirrors.aliyun.com/ubuntu/ focal-proposed main restricted universe multiverse

deb http://mirrors.aliyun.com/ubuntu/ focal-backports main restricted universe multiverse
deb-src http://mirrors.aliyun.com/ubuntu/ focal-backports main restricted universe multiverse
更改完成之后再执行以下命令
sudo apt-get update然后安装常用的工具
sudo apt-get install zsh wget curl zip git vim使用ohmyzsh美化,安装命令任选一个
| curl | sh -c "$(curl -fsSL https://raw.githubusercontent.com/ohmyzsh/ohmyzsh/master/tools/install.sh)" |
|---|---|
| wget | sh -c "$(wget -O- https://raw.githubusercontent.com/ohmyzsh/ohmyzsh/master/tools/install.sh)" |
| fetch | sh -c "$(fetch -o - https://raw.githubusercontent.com/ohmyzsh/ohmyzsh/master/tools/install.sh)" |
如果执行命令失败的话可以下载下来,命令端切换到下载目录。下载地址 ohmyzsh
执行./tools/install.sh即可进行本地安装
完成之后即可更改ohmyzsh主题
vim ~/.zshrc更改主题名,引号之中就是你喜欢的主题名,更多主题请看[Themes · ohmyzsh](Themes - Wiki - Gitee.com
ZSH_THEME="pygmalion"修改完主题后,因为缺少一个合适的字体,所以主题的图标显示有所异常。因此,我们需要安装一下powerline字体到我们的Windows系统中(非WSL)来解决这个问题。
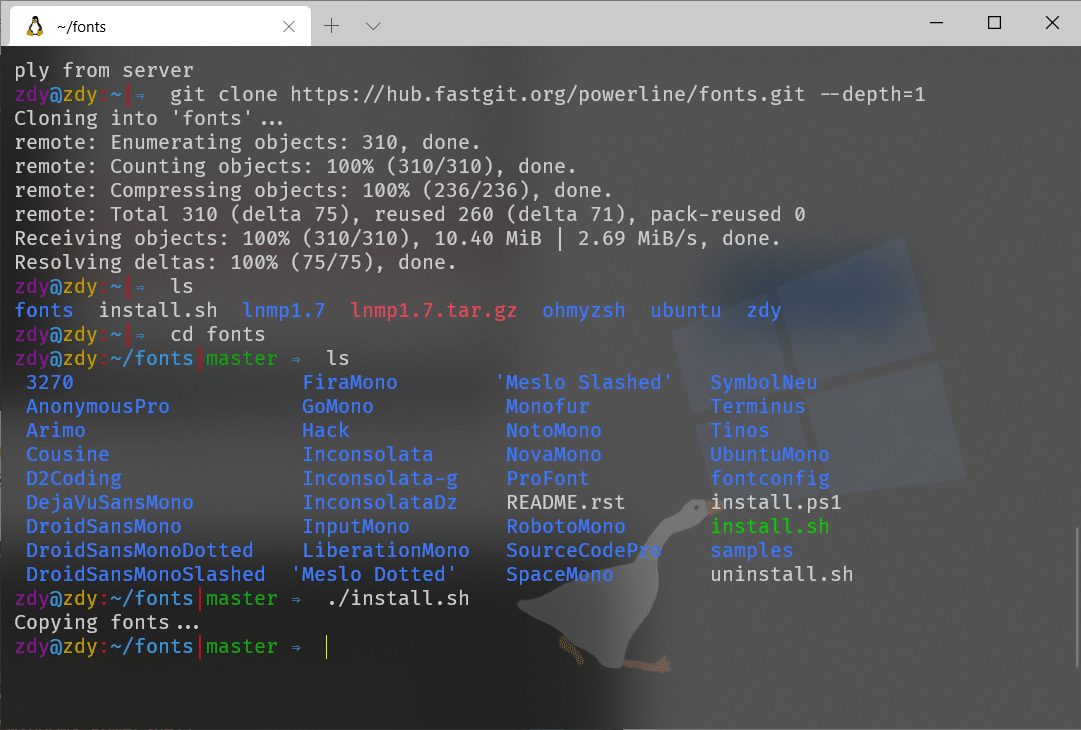
我们可以根据 Github 的指引,在 Powershell 中使用git来安装。两个镜像地址二选一使用,国内推荐第二种
git clone https://github.com/powerline/fonts.git --depth=1 #原镜像地址
git clone https://hub.fastgit.org/powerline/fonts.git --depth=1 #加速镜像地址

cd fonts # git clone的文件夹
./install.sh
如果你不太熟悉git安装,也可以下载仓库的zip文件,解压后双击运行文件夹中的 “install.sh”文件或者“install.ps1”文件即可。
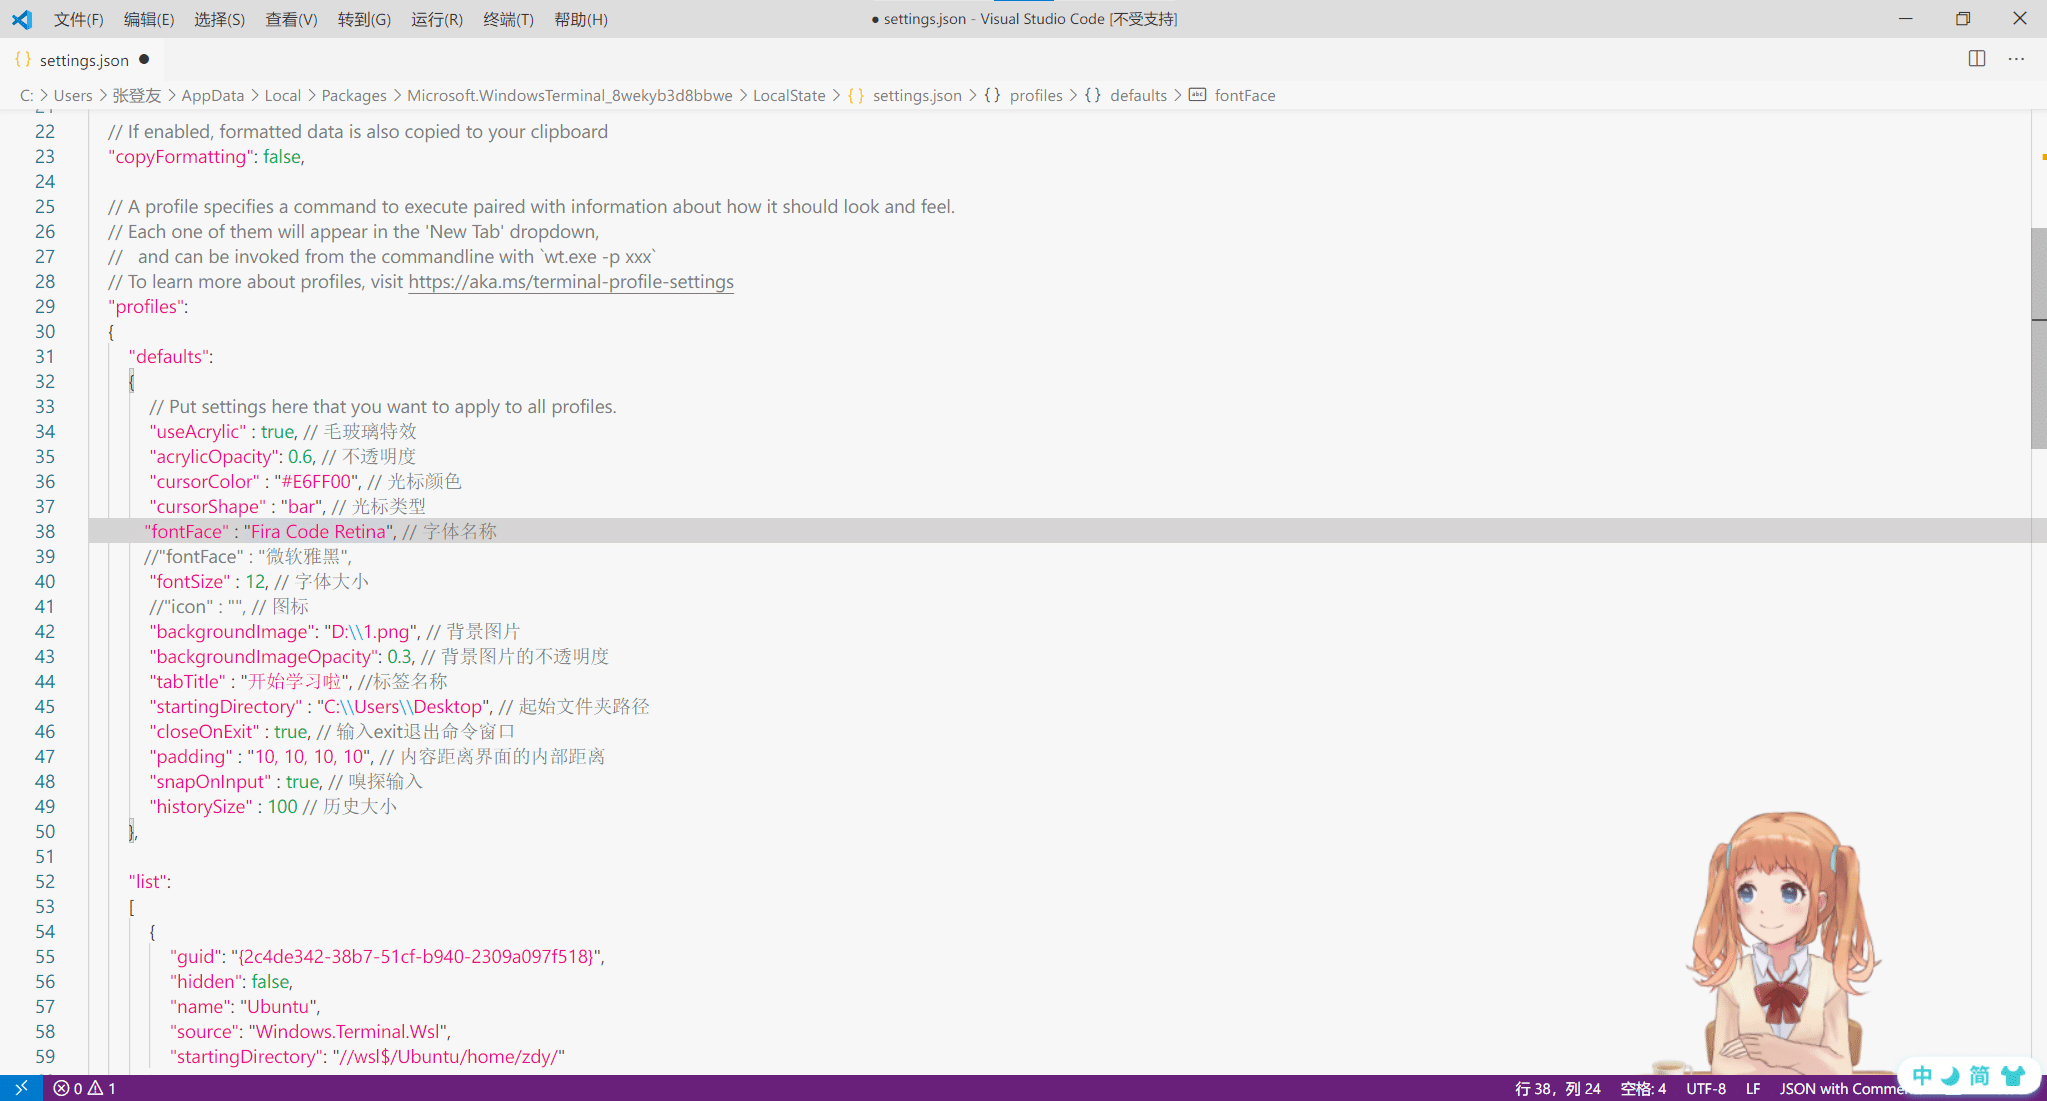
上一步命令执行完毕之后,进入terminal设置文件 “settings.json” 后,找到 “profiles” 字段下的 “list” 字段,在WSL配置模块中增加或修改 fontFace 字段为你想要的字体名称。(字体名称改为刚刚安装好的 Powerline 字体中的一种,我使用的是DejaVu Sans Mono for Powerline字体)
到这里差不多就结束了,但是还可以再安装好用的zsh插件
安装zsh常用插件
zsh中有许多优秀的插件帮助我们提高效率,下面介绍两个常用插件的安装流程,分别是语法高亮插件和自动提示插件。首先,将当前路径切换到 plugins 目录中。
cd ~/.oh-my-zsh/custom/plugins之后,我们用git下载这两款插件到 WSL 中。
# git下载 zsh-syntax-highlighting
git clone https://github.com/zsh-users/zsh-syntax-highlighting.git ${ZSH_CUSTOM:-~/.oh-my-zsh/custom}/plugins/zsh-syntax-highlighting

# git下载 zsh-autosuggestions
git clone https://github.com/zsh-users/zsh-autosuggestions ${ZSH_CUSTOM:-~/.oh-my-zsh/custom}/plugins/zsh-autosuggestions
下载完成后,我们修改一下zsh的配置文件,使插件生效。
# 首先用vim进入.zshrc配置文件
vim ~/.zshrc

# 之后利用vim编辑文件为
plugins=(
        zsh-syntax-highlighting
        zsh-autosuggestions
        )
source $ZSH/oh-my-zsh.sh
source $ZSH_CUSTOM/plugins/zsh-syntax-highlighting/zsh-syntax-highlighting.zsh
source $ZSH_CUSTOM/plugins/zsh-autosuggestions/zsh-autosuggestions.zsh最后是完成效果